|
|
| Line 1: |
Line 1: |
| − | <nowiki>Insert non-formatted text here</nowiki>[[Category:Tutorials]]
| + | [[Category:Tutorials]] |
| | <languages /> | | <languages /> |
| − | <translate>
| |
| − |
| |
| | == Disclaimer == | | == Disclaimer == |
| | | | |
| Line 62: |
Line 60: |
| | Place the Daylight Sensor facing up, note which direction the Data Port is facing, and which direction the solar panel Power Port is facing. These two directions are needed in the code. The Daylight Sensor is connected to the d0 screw, that's all you need. | | Place the Daylight Sensor facing up, note which direction the Data Port is facing, and which direction the solar panel Power Port is facing. These two directions are needed in the code. The Daylight Sensor is connected to the d0 screw, that's all you need. |
| | | | |
| − | The code can be found here: https://stationeering.com/tools/ic/_2AA5WqsCh6f | + | The code can be found here: https://stationeering.com/tools/ic/_2AB4Y9MFmKD |
| − | | |
| − | == Outdated designs (to be deleted) ==
| |
| − | === 8-chip two-axis Solar Tracking ===
| |
| − | '''Author:''' Eearslya, Neouni, 𝕽𝖘𝖆𝟗𝟕 and everyone of the #logic-circuit-discussion (guide most recently revised by Enthaply Guy, ThunderGod97)<br>
| |
| − | '''Stationeers Version:''' 0.2.2768.13597 and up<br>
| |
| − | '''Number of Components:''' 9<br>
| |
| − | '''Accuracy:''' At least 98% (I've seen it go as low as 98.35% for a brief time during sunrise)
| |
| − | <br>'''Math Formula:''' <code>F(x,y) = {x, (75 ± y) / 1.5}</code> where '''x''' is the horizontal solar angle and '''y''' is the vertical solar angle.
| |
| − | | |
| − | ==== Design ====
| |
| − | * 1 [[Sensors|Kit (Sensors)]]
| |
| − | * 4 [[Kit (Logic I/O)]]
| |
| − | * 2 [[Kit (Logic Memory)]]
| |
| − | * 2 [[Kit (Logic Processor)]] ("Math Unit")
| |
| − | | |
| − | This is about as lean as it gets for a two-axis setup. Here are the major points for why the old "12-component, two-sensor" setup is outdated:
| |
| − | * The Daylight Sensor has been improved to deliver both horizontal and vertical data via variables, there's no need for two sensors
| |
| − | * Changes to the solar panels has made the horizontal angle absolute, so you don't need to have circuits for correcting the horizontal angle
| |
| − | | |
| − | [[File:2-Axis-Solar-Logic-fixed.png]]
| |
| − | | |
| − | *Daylight Sensor (Face data-port north for maximum efficiency)
| |
| − | *Horizontal Reader ('''A''') (IN: Daylight Sensor - VAR: Horizontal)
| |
| − | *Horizontal Batch Writer ('''B''') (IN: Horizontal Reader - OUT: Solar Panel (Dual) - VAR: Horizontal)
| |
| − | *Math Processor 2 ('''C''') (IN1: Math 1 - IN2: Memory 1.5 - OUT: Divide)
| |
| − | *Vertical Reader ('''D''') (IN: Daylight Sensor - VAR: Vertical)
| |
| − | *Vertical Batch Writer ('''E''') (IN: Math 2 - OUT: Solar Panel (Dual) - VAR: Vertical)
| |
| − | *Math Processor 1 ('''F''') (IN1: Memory 75 - IN2: Vertical Reader - OUT: Add/Subtract) (Depends on whether the solar-panels' data-ports face east or west.)
| |
| − | *Memory 75 ('''G''') (75)
| |
| − | *Memory 1.5 ('''H''') (1.5)
| |
| − | | |
| − | If you want this setup to be a one-axis tracker, just skip the green chips, and manually wrench the panels to face the sun.
| |
| − | | |
| − | === Horizontal sensor orientation ===
| |
| − | Orientation of the data-port on the horizontal sensor matters! Depending on where the data-port points, the solar-panels will will do a horizontal reorientation at either midnight (north, 000), dawn (east, 090), noon (south, 180), or dusk (west, 270).
| |
| − | The worst position is to have the data-port pointing south, as efficiency drops from 99% to ~70% during the transition. North is the position with the least impact, because the solar panels aren't generating any power when the panels transition.
| |
| − | | |
| − | The reason for this transition is that the horizontal angle goes from -179 degrees to +180 degrees. As the sun moves from +180 to -179 degrees, the solar panels do a time-consuming -359 degree move instead of an efficient +1 degree move.
| |
| − | | |
| − | <small>Credit for alternatives: PoolSharkFOG, bti, and Fudd79</small>
| |
| − | | |
| − | ==== Two-axis IC alternative ====
| |
| − | This setup can be also programmed in an IC10 chip which saves power because you need only 1 chip instead of 8.
| |
| − | | |
| − | '''Required:'''<br>
| |
| − | * 1x IC10 Chip plus IC housing
| |
| − | * 1x Kit (Sensor) to make a Daylight Sensor
| |
| − | | |
| − | Connect '''Daylight Sensor''' to '''d0''', that's it! This program writes directly to both regular and heavy solar panels, and it also resets to face the sunrise when the sun goes below the horizon.
| |
| − | | |
| − | The code can be found here: https://stationeering.com/tools/ic/_2AA3esQShsu (valid as of Update 0.2.3036.15111 - 2021-10-31).
| |
| − | | |
| − | '''Adjustments you may need to make:'''<br>
| |
| − | * If your solar panel data-ports face '''west''' instead of east, replace the '''sub''' on line 21 with '''add''', and the '''-90''' on lines 43/44 to '''90'''.
| |
| − | * If you are connecting to the Solar Panel (Dual) You will need to replace the Solar Panel hash from ''''-2045627372''' to '''-539224550'''. You could add the hash to a new variable if you use both types of Solar Panels in a system. All item hashes can be found here [[ItemHash]].
| |
| − | * The way the reset works, the panels are turned away from the sun while there's still sunlight to soak up. So if you want to squeeze every last photon out, comment outlines 7, 14, 16, and the entire reset-block (lines 38-48).
| |
| − | | |
| − | <small>Code provided by bti, comments and readability changes by Fudd79</small>
| |
| − | | |
| − | === 9-chip 1-sensor 1-axis Solar Tracking ===
| |
| − | '''Authors:''' Wooodiii, Corvus_bkgk, Enfantcool, Baksch, Wgairborne (IC)<br>
| |
| − | '''Properties:''' Accurate (average error 1.3°), Auto-reset (variant), Power conserving (variant)<br>
| |
| − | '''Number of Components:''' 10-12
| |
| − | <br>'''Math Formula:''' <code>f(x) = min((x-min(x,15))/1.5, 100)</code> where '''x''' is the solar angle.
| |
| − | | |
| − | '''Note: With the introduction of ecliptic solar angles, this setup no longer works well on worlds such as Vulkan and Europa which have the sun at an angle. This setup will still work on the Moon and in Space, and will be acceptable on Mars and Loulan.'''
| |
| − | | |
| − | This setup is accurate, giving 495-500W throughout the day, with lower output only when the sun is lower than the panels can physically aim at.
| |
| − | | |
| − | This setup adjusts for the fact that solar panels rotate through only 150 degrees. Instead of converting using 180/100, this setup converts by doing 150/100. It then clips the value at the edges, where the prior calculation would give elevations that are negative or greater than 100 (representing the fact that we would prefer the panel to track past 0 or 100, aiming all the way down to the horizon instead of stopping 15° short). The listed average error is nonzero only because of this completely unavoidable portion; the error is 0 throughout the 15°-165° portion of the day.
| |
| − | | |
| − | This setup produces the equivalent of 274W averaged over a whole day/night cycle.
| |
| − | | |
| − | ==== Design ====
| |
| − | * 1 [[Sensors |Kit (Sensors)]] ("Daylight Sensor")
| |
| − | * 2 [[Kit (Logic I/O)]] (1 "Logic Reader", 1 "Batch Writer")
| |
| − | * 3 [[Kit (Logic Memory)]]
| |
| − | * 4 [[Kit (Logic Processor)]] (2 "Math Unit", 2 "Min/Max Unit")
| |
| − | | |
| − | * The [[Sensors#Daylight_Sensor|Daylight Sensor]] should face the sunrise.
| |
| − | * Solar panels should be rotated such that 0% vertical faces the sunrise.
| |
| − | | |
| − | | |
| − | {| class="wikitable"
| |
| − | |-
| |
| − | ! Component (Name) !! Settings !! Explanation
| |
| − | |-
| |
| − | | Logic Reader (A) || Daylight sensor, Solar angle || Sun's angle above the horizon
| |
| − | |-
| |
| − | | Memory (15) || 15 || True angle of solar panels at 0 elevation
| |
| − | |-
| |
| − | | Memory (1.5) || 1.5 || 150/100, the conversion constant from solar angle (range:15-165, i.e. 150) to panel elevation (range:0-100)
| |
| − | |-
| |
| − | | Min/Max Unit (B) || min(A,15) || Adjustment amount: 15, unless that would take A-B negative, in which case only enough to reach 0 (low edge case). Equivalent to min(A-B,0) but doesn't require storing 0.
| |
| − | |-
| |
| − | | Math Unit (C) || A-B || Adjusted solar angle
| |
| − | |-
| |
| − | | Math Unit (D) || C/1.5 || Conversion from solar angle to panel elevation
| |
| − | |-
| |
| − | | Memory (100) || 100 || Maximum possible panel elevation
| |
| − | |-
| |
| − | | Min/Max Unit (E) || min(D,100) || Cap elevation to 100 for solar angles past 165° (high edge case). Equivalent to doing min(A-B,165) before step D, but 100 is easier to set in memory than 165.
| |
| − | |-
| |
| − | | Batch Writer || E -> Solar panels, Vertical angle || Send elevation to solar panels
| |
| − | |}
| |
| − | | |
| − | [[File:Accurate Solar Control.png]]
| |
| − | | |
| − | ==== Auto-Reset Variant ====
| |
| − | For panels that automatically reset their facing upon sunset, use two more components, and adjust the final min/max unit:
| |
| − | {| class="wikitable"
| |
| − | |-
| |
| − | ! Component (Name) !! Settings !! Explanation
| |
| − | |-
| |
| − | | Logic Reader (L) || Daylight sensor, Activation || 1 while daytime, 0 while nighttime
| |
| − | |-
| |
| − | | Math Unit (F) || 100*L || Maximum panel elevation, now 100 during day and 0 at night
| |
| − | |-
| |
| − | | (from above) Min/Max Unit (E) || min(D,'''F''') || Adjusted panel elevation (high edge adjustment)
| |
| − | |}
| |
| − | | |
| − | ==== Power-Conserving Variant ====
| |
| − | To conserve power, it's possible to avoid running the entire circuit at night. A transformer can be controlled to power the main logic network above. In this way, only the two new components need to remain powered at all times.
| |
| − | | |
| − | {| class="wikitable"
| |
| − | |-
| |
| − | ! Component (Name) !! Settings !! Explanation
| |
| − | |-
| |
| − | | Logic Reader (L) || Daylight sensor, Activation || As in the auto-reset variant above
| |
| − | |-
| |
| − | | Logic Writer || L -> Transformer, On || Transformer powers main logic network
| |
| − | |}
| |
| − | | |
| − | === IC Chip Version ===
| |
| − | * 1 [[Kit (IC Housing)]]
| |
| − | * 1 [[Sensors |Kit (Sensors)]] ("Daylight Sensor")
| |
| − | Daylight Sensor should point at sunrise.
| |
| − | <br>
| |
| − | IC Housing's pins are set with "00" being set to the Daylight Sensor, and "01" being set to one of the panels to determine hash. '''ONLY USE ONE TYPE OF PANEL'''
| |
| − | | |
| − | Link to IC Code: [https://stationeering.com/tools/ic/_nfitKD6aL7 [1<nowiki>]</nowiki>]
| |
| − | | |
| − | | |
| − | ----
| |
| − | | |
| − | === 4-chip 1-sensor 1-axis Approximate Solar Tracking ===
| |
| − | '''Author:''' Evie<br>
| |
| − | '''Stationeers Version:''' 0.1.1068.5451<br>
| |
| − | '''Properties:''' Simple, Inaccurate (Average error: 7.5°)<br>
| |
| − | '''Number of Components:''' 5
| |
| − | | |
| − | '''Note: With the introduction of ecliptic solar angles, this setup no longer works at peak efficiency on worlds such as Mars and Europa which have the sun at an angle. This setup will still work on the Moon and in Space.'''
| |
| − | | |
| − | This imperfect setup is a common starting point. It starts off at 375w of power in the morning, builds up to 500w at zenith (noon) then back to 375. This is due to the fact that solars rotate through only 150 degrees of elevation and that this setup's math is correct only if they rotated through all 180 degrees of solar angle.
| |
| − | | |
| − | This setup produces the equivalent of 239W averaged over a whole day/night cycle.
| |
| − | | |
| − | ==== Design ====
| |
| − | * 1 [[Sensors |Kit (Sensors)]]
| |
| − | * 2 [[Kit (Logic I/O)]]
| |
| − | * 1 [[Kit (Logic Memory)]]
| |
| − | * 1 [[Kit (Logic Processor)]] ("Math Unit")
| |
| − | | |
| − | [[File:Evie's Solar Circuit Setup.jpg|none|Solar Setup Diagram]]
| |
| − | [[File:Stationeers-compact solar logic.png|none|A super compact version]]
| |
| − | | |
| − | ==== Notes ====
| |
| − | * The Daylight [[Sensor]] MUST be facing East (Sunrise), but its rotation doesn't matter.
| |
| − | * Solar panels should be rotated such as that 0% VERTICAL rotation faces East/Sunrise, and 100% VERTICAL faces West/Sunset.
| |
| − | * The Area [[Power Control]] is necessary for the circuit to stay powered during the night. It also hides all the modules from the rest of your system.
| |
| − | * Make sure that the math unit is set to "Divide" operation.
| |
| − | * Importantly, the solar input power doesn't directly connect to any of the logic writers. This not only ensures your system doesn't lose power but also prevents short-circuiting that would burn cables.
| |
| − | * Using 1.7 instead of 1.8 reduces the average error of this design to 6.5° and increases overall power generation, particularly in the afternoon.
| |
| − | </translate>
| |
| − | | |
| − | === [[Solar Logic Cable Golf]] ===
| |
| − | | |
| − | {{cable Golf Rules}}
| |
| − | * Cables needed to propagate the output of the Batch/[[Logic Writer]]s to the top edge of a frame are counted in the score
| |
Disclaimer
Due to the frequency of game updates, all solutions are subject to change and may or may not be functional.
The designs on this page are valid as of v0.2.3304.16432 (2022-06-06)
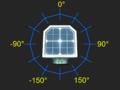
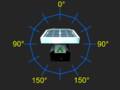
Geometry Of Solar Panels and Daylight Sensors
Geometry of values measured by daylight sensor in horizontal (yaw) mode
Geometry of values measured by daylight sensor in vertical (pitch) mode
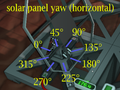
Effect of setting horizontal rotation of a solar panel
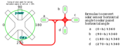
Equations relating horizontal sensor measurements from various orientations to solar panel horizontal rotation
Solar tracking using Logic Chips
Two-chip single-axis tracking
This is the most basic solar tracking available, and is all you need on the Moon. It even works reasonably well on Mars.
What you need:
- Kit (Logic I/O) x2
- Kit (Sensor) > Daylight Sensor
Place the Daylight Sensor facing sunrise or sunset (doesn't matter which), with the Data Port facing north.
Place a Logic Reader (IN = Daylight Sensor, VAR = Solar Angle/Vertical) and a Batch Writer (IN = Logic Reader, OUT = Solar Panels, VAR = Vertical).
Connect to the Data Port on Solar Panels.
Hand-crank the panels to face the sunrise, and they will do their thing.
Four-chip dual-axis tracking
To get a slightly more accurate solar tracker on planets with an offset solar arc, you need to include the Horizontal component to the solar angle.
What you need:
- Kit (Logic I/O) x4
- Kit (Sensor) > Daylight Sensor
Place the Daylight Sensor facing sunset, with the Data Port facing north.
For the vertical, place a Logic Reader (IN = Daylight Sensor, VAR = Solar Angle/Vertical) and a Batch Writer (IN = Logic Reader, OUT = Solar Panels, VAR = Vertical).
For the horizontal, place a Logic Reader (IN = Daylight Sensor, VAR = Horizontal) and a Batch Writer (IN = Logic Reader, OUT = Solar Panels, VAR = Horizontal).
Connect to the Data Port on Solar Panels.
The panels should align themselves to the sun if you make sure to put the Power Port on the panels facing east (90 degrees).
This setup isn't very accurate, and panel efficiency drops to ~80% during the day.
Solar tracking using Integrated Circuits
This is the most powerful way to track the sun, but the implementation might e a bit daunting at first.
What you need:
- Integrated Circuit (IC10)
- Kit (IC Housing)
- Kit (Sensor) > Daylight Sensor
And if you don't already have one set up:
- Kit (Computer)
- IC Editor Motherboard
Place the Daylight Sensor facing up, note which direction the Data Port is facing, and which direction the solar panel Power Port is facing. These two directions are needed in the code. The Daylight Sensor is connected to the d0 screw, that's all you need.
The code can be found here: https://stationeering.com/tools/ic/_2AB4Y9MFmKD