Difference between revisions of "Guide (Airlock) Atmosphere to Atmosphere"
From Unofficial Stationeers Wiki
Ipottinger (talk | contribs) m (Update power loss concern) |
(→Troubleshooting: typo) |
||
| (14 intermediate revisions by 8 users not shown) | |||
| Line 3: | Line 3: | ||
<translate> | <translate> | ||
==Description== | ==Description== | ||
| − | An Atmosphere to Atmosphere Airlock is a [[Room | + | An Atmosphere to Atmosphere Airlock is a [[Room]] that can evacuate its internal volume and refill it with either of the two differing [[Atmosphere]]s it connects. It has two airtight [[Portal]]s which do not open simultaneously. An Atmosphere to Atmosphere Airlock allows passage between two environments without the exchange of [[Gas]]es or [[Pressure]]. |
| − | An Atmosphere to Atmosphere Airlock can be controlled automatically | + | An Atmosphere to Atmosphere Airlock can be controlled automatically using a [[Circuitboard (Advanced Airlock)]] installed within a [[Console]] which will refer to each of the two separated environments as either "interior" or "exterior". |
| − | + | When activated with the interior-portal open, the system will automatically close the interior-portal and will activate the interior-[[Active Vent|Active-Vent]] to try to evacuate the interior-atmosphere from the airlock chamber. Once a total vacuum is achieved within all of the [[Large Grid Atmosphere|Large Grid Volume]]s in which selected [[Gas Sensor]]s reside, the airlock will activate the exterior-Active-Vent to try to pressurize the chamber with exterior-atmosphere. Only after the internal pressure within all of the Large Grid Volumes in which selected Gas Sensors reside equals or exceeds the "External ###Pa" specified in the [[Circuitboard (Advanced Airlock)#Settings|Circuitboard's settings]] will the exterior-portal automatically open. | |
| − | + | When activated with the exterior-portal open, a similar process to the above is executed, swapping interior for exterior, exterior for interior, and the final airlock pressure governed by the "Internal ###Pa" setting instead. | |
==Materials== | ==Materials== | ||
| − | Material requirements for | + | Material requirements for a minimnum Atmosphere to Atmosphere Airlock are: |
| − | * | + | * 2 x [[Portal]]: variants of either [[Kit (Airlock)]], [[Kit (Blast Door)]], [[Kit (Door)]], or [[Kit (Docking Port)]] |
| − | * | + | * 1 x [[Kit (Consoles) Console|Kit (Consoles) Console]] |
| − | * | + | * 1 x [[Circuitboard (Advanced Airlock)]] |
| − | * | + | * 1 x [[Glass Sheets]] |
| − | * | + | * 1 x [[Data Disk]] |
| − | * | + | * 1 x [[Kit (Sensors) Gas Sensor]] |
| − | * | + | * 2 x [[Kit (Active Vent)]] |
| − | * | + | * 2 x [[Kit (Passive Vent)]] (optional) |
| − | * | + | * 1 x [[Kit (Flashing Light)]] (optional) |
| − | * | + | * 1 x [[Kit (Power Controller)]] (optional) |
| − | * | + | * 4 x [[Kit (Pipe)]] |
| − | * | + | * # x [[Cable Coil]] |
==Construction== | ==Construction== | ||
A minimum Atmosphere to Atmosphere Airlock can be constructed using the following instructions: | A minimum Atmosphere to Atmosphere Airlock can be constructed using the following instructions: | ||
| − | # Place | + | # Place two [[Portal]]s one [[Large Grid]] apart with the power and data ports facing into the airlock's interior. |
| − | # Using the [[Labeller]], rename each | + | # Using the [[Labeller]], rename each portal as "Interior-Door" and "Exterior-Door" appropriately. |
| − | # Enclose the | + | # Ensure the "Exterior-Door" is OPEN, and the "Interior-Door" is CLOSED. |
| − | # Place Console, Active | + | # Enclose the four remaining sides of the airlock chamber with airtight [[Frames]], [[Walls]], or [[Windows]]. |
| − | # Attach | + | # Place [[Console]], [[Active Vent]]s, [[Gas Sensor]], and optional [[Flashing Light]] and [[Power Controller]] somewhere within the airlock's interior. |
| − | + | # Ensure all placed devices are attached to the same [[Wire Network]] including the portals' power and data ports. | |
| − | # Ensure "interior" and "exterior" pipe | + | # Ensure the airlock's wire network is connected to an active [[Power Supply]] and all devices can receive power. |
| − | + | # Using the Labeller, rename each Active Vent as "Interior Vent" and "Exterior Vent" appropriately. | |
| − | # Insert Circuitboard (Advanced Airlock) into the console, then place the | + | # Attach a [[Pipe Network]] to each Active Vent large enough to hold the volume of the airlock or pass it through to a [[Passive Vent]] placed in the "interior" or "exterior" environment. |
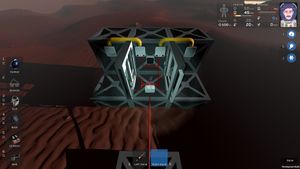
| − | # Insert Data Disk into the side slot of Console | + | # Ensure "interior" and "exterior" pipe networks are not connected together or to any other pipe networks.[[File:Guide adv airlock bare.jpg|thumb|advanced airlock with 2 walls removed for better visibility]] |
| − | # | + | # Insert [[Circuitboard (Advanced Airlock)]] into the console, then place the [[Glass Sheet]] onto the console. |
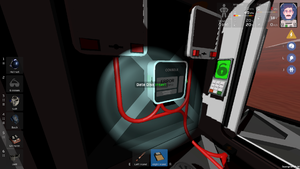
| − | # Find and click "Exterior-Door" followed by all caps and green "EXTERIOR". NOTE: SELECT THIS FIRST! | + | # Insert [[Data Disk]] into the side slot of Console then power on the Console.[[File:Guide adv airlock config0.png|thumb|slot to insert data disk]] |
| + | # '''The following steps may be done with the game paused.''' | ||
| + | # Use the console's up and down arrows to scroll through the list of devices. Click to select. Click again to deselect if incorrect | ||
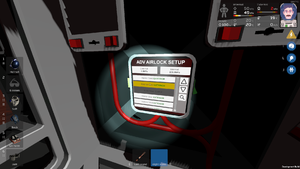
| + | # Find and click "Exterior-Door" followed by all caps and green "EXTERIOR". NOTE: SELECT THIS FIRST![[File:Guide adv airlock config1.png|thumb|make sure to click the exterior door and vent first]] | ||
# Ensure the Exterior-Door's lock-indicator has turned from green to red. | # Ensure the Exterior-Door's lock-indicator has turned from green to red. | ||
# Find and click "Exterior-Vent" followed by all caps and green "EXTERIOR". NOTE: SELECT THIS SECOND! | # Find and click "Exterior-Vent" followed by all caps and green "EXTERIOR". NOTE: SELECT THIS SECOND! | ||
| Line 49: | Line 52: | ||
# Find and click "Flashing Light" followed by all caps and green "LIGHT". (optional) | # Find and click "Flashing Light" followed by all caps and green "LIGHT". (optional) | ||
# Toward the top left of the Console find and click "External ###Pa". Set to match the exterior-environment's typical pressure. (optional) | # Toward the top left of the Console find and click "External ###Pa". Set to match the exterior-environment's typical pressure. (optional) | ||
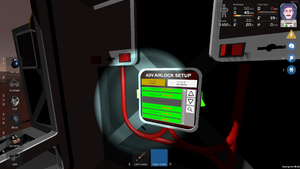
| − | # Toward the top right of the Console find and click "Internal ###Pa". Set to match the interior-environment's typical pressure. (optional) | + | # Toward the top right of the Console find and click "Internal ###Pa". Set to match the interior-environment's typical pressure. (optional)[[File:Guide adv airlock config3.png|thumb|set pressures appropriate to each side]] |
# Remove Data Disk from the side slot of Console. | # Remove Data Disk from the side slot of Console. | ||
| − | + | <br>If there is an error the console screen will say so and the power light will flash yellow. | |
| − | If there is an error the console screen will say so and the power light will flash yellow. | ||
==Console Slaves== | ==Console Slaves== | ||
| − | + | Additional consoles are useful when airlocks become large or remote control is desired. Multiple [[Circuitboard (Advanced Airlock)#Console Slave|Console Slave]]s can be attached using the following instructions: | |
| − | # Using the [[Labeller]], rename the original | + | # Using the [[Labeller]], rename the original [[Console]] as "Master Console". |
| − | # Place additional consoles such that they all | + | # Place additional consoles such that they all attached to the same [[Wire Network]] connected to the "Master Console". |
| − | # Using the | + | # Using the Labeller, rename each additional console as "Slave Console 1", "Slave Console 2" ... |
| − | # Insert Circuitboard (Advanced Airlock) into each additional console, then place | + | # Insert [[Circuitboard (Advanced Airlock)]] into each additional console, then place a [[Glass Sheet]] onto the additional consoles. |
| − | # Insert Data Disk into the side slot of the powered on Master | + | # Insert [[Data Disk]] into the side slot of the powered on "Master Console". |
| − | # | + | # Use the "Master Console's" up and down arrows to scroll through the list of devices. Click to select. Click again to deselect if incorrect |
# Find and click "Slave Console #" followed by all caps and green "MAKE SLAVE" for each additional console. | # Find and click "Slave Console #" followed by all caps and green "MAKE SLAVE" for each additional console. | ||
| − | # Remove Data Disk from the side slot of Master | + | # Remove Data Disk from the side slot of "Master Console". |
# Power on each additional console. | # Power on each additional console. | ||
| − | + | <br>If there is an error the console screen will say so and the power light will flash yellow. | |
| + | |||
==Troubleshooting== | ==Troubleshooting== | ||
| − | When powered, all associated doors and vents are locked, preventing their manual use even when power is denied. This can be a problem | + | When powered, all associated doors and vents are locked, preventing their manual use even when power is subsequently denied. This can be a problem when trapped within an airlock during a power outage. Best practise is to ensure the airlock's wire network is connected to an emergency [[Power Supply]] such as a [[Battery Cell]] equipped [[Power Controller]]. |
| + | |||
| + | If the "External #Pa" or "Internal #Pa" are set to 0, the corresponding pressurization phase will be skipped, speeding up the cycle time, but can result in large wind currents when doors open. | ||
| − | + | A pressurization phase will stall if there is not enough gas available to the interior or exterior [[Active Vent]] to reach the set "Internal #Pa" or "External #Pa" specified in the [[Circuitboard (Advanced Airlock)#Settings|Circuitboard's settings]]. Such stalled pressurization can be skipped by clicking the yellow "Cancel Pressurize" button on a console. | |
| − | + | A depressurization phase will stall if a complete vacuum cannot be achieved within the [[Large Grid Atmosphere|Large Grid Volume]]s in which all selected [[Gas Sensor]]s reside. Such stalled depressurization can be skipped by clicking the yellow "Cancel Depressurize" button on a console, but atmospheric mixing may occur. In larger airlocks, ensure there is one Gas Sensor per Large Grid to prevent premature repressurization and the resulting mixture of interior and exterior atmospheres. | |
| − | + | The setup of slave consoles <em>may</em> still be bugged in such a way that after initial setup the slave console will show the config of an airlock, but be grayed out and not accept any input. It has been noted in several community posts that saving the game, quitting out of the game, and then reloading the save will allow the slave consoles to work after the reload. | |
==See Also== | ==See Also== | ||
Latest revision as of 09:20, 3 September 2023
Description[edit]
An Atmosphere to Atmosphere Airlock is a Room that can evacuate its internal volume and refill it with either of the two differing Atmospheres it connects. It has two airtight Portals which do not open simultaneously. An Atmosphere to Atmosphere Airlock allows passage between two environments without the exchange of Gases or Pressure.
An Atmosphere to Atmosphere Airlock can be controlled automatically using a Circuitboard (Advanced Airlock) installed within a Console which will refer to each of the two separated environments as either "interior" or "exterior".
When activated with the interior-portal open, the system will automatically close the interior-portal and will activate the interior-Active-Vent to try to evacuate the interior-atmosphere from the airlock chamber. Once a total vacuum is achieved within all of the Large Grid Volumes in which selected Gas Sensors reside, the airlock will activate the exterior-Active-Vent to try to pressurize the chamber with exterior-atmosphere. Only after the internal pressure within all of the Large Grid Volumes in which selected Gas Sensors reside equals or exceeds the "External ###Pa" specified in the Circuitboard's settings will the exterior-portal automatically open.
When activated with the exterior-portal open, a similar process to the above is executed, swapping interior for exterior, exterior for interior, and the final airlock pressure governed by the "Internal ###Pa" setting instead.
Materials[edit]
Material requirements for a minimnum Atmosphere to Atmosphere Airlock are:
- 2 x Portal: variants of either Kit (Airlock), Kit (Blast Door), Kit (Door), or Kit (Docking Port)
- 1 x Kit (Consoles) Console
- 1 x Circuitboard (Advanced Airlock)
- 1 x Glass Sheets
- 1 x Data Disk
- 1 x Kit (Sensors) Gas Sensor
- 2 x Kit (Active Vent)
- 2 x Kit (Passive Vent) (optional)
- 1 x Kit (Flashing Light) (optional)
- 1 x Kit (Power Controller) (optional)
- 4 x Kit (Pipe)
- # x Cable Coil
Construction[edit]
A minimum Atmosphere to Atmosphere Airlock can be constructed using the following instructions:
- Place two Portals one Large Grid apart with the power and data ports facing into the airlock's interior.
- Using the Labeller, rename each portal as "Interior-Door" and "Exterior-Door" appropriately.
- Ensure the "Exterior-Door" is OPEN, and the "Interior-Door" is CLOSED.
- Enclose the four remaining sides of the airlock chamber with airtight Frames, Walls, or Windows.
- Place Console, Active Vents, Gas Sensor, and optional Flashing Light and Power Controller somewhere within the airlock's interior.
- Ensure all placed devices are attached to the same Wire Network including the portals' power and data ports.
- Ensure the airlock's wire network is connected to an active Power Supply and all devices can receive power.
- Using the Labeller, rename each Active Vent as "Interior Vent" and "Exterior Vent" appropriately.
- Attach a Pipe Network to each Active Vent large enough to hold the volume of the airlock or pass it through to a Passive Vent placed in the "interior" or "exterior" environment.
- Ensure "interior" and "exterior" pipe networks are not connected together or to any other pipe networks.
- Insert Circuitboard (Advanced Airlock) into the console, then place the Glass Sheet onto the console.
- Insert Data Disk into the side slot of Console then power on the Console.
- The following steps may be done with the game paused.
- Use the console's up and down arrows to scroll through the list of devices. Click to select. Click again to deselect if incorrect
- Find and click "Exterior-Door" followed by all caps and green "EXTERIOR". NOTE: SELECT THIS FIRST!
- Ensure the Exterior-Door's lock-indicator has turned from green to red.
- Find and click "Exterior-Vent" followed by all caps and green "EXTERIOR". NOTE: SELECT THIS SECOND!
- Find and click "Interior-Door" followed by all caps and green "INTERIOR".
- Ensure the Interior-Door's lock-indicator has turned from green to red.
- Find and click "Interior-Vent" followed by all caps and green "INTERIOR".
- Find and click "Gas Sensor" followed by all caps and green "SENSOR".
- Find and click "Flashing Light" followed by all caps and green "LIGHT". (optional)
- Toward the top left of the Console find and click "External ###Pa". Set to match the exterior-environment's typical pressure. (optional)
- Toward the top right of the Console find and click "Internal ###Pa". Set to match the interior-environment's typical pressure. (optional)
- Remove Data Disk from the side slot of Console.
If there is an error the console screen will say so and the power light will flash yellow.
Console Slaves[edit]
Additional consoles are useful when airlocks become large or remote control is desired. Multiple Console Slaves can be attached using the following instructions:
- Using the Labeller, rename the original Console as "Master Console".
- Place additional consoles such that they all attached to the same Wire Network connected to the "Master Console".
- Using the Labeller, rename each additional console as "Slave Console 1", "Slave Console 2" ...
- Insert Circuitboard (Advanced Airlock) into each additional console, then place a Glass Sheet onto the additional consoles.
- Insert Data Disk into the side slot of the powered on "Master Console".
- Use the "Master Console's" up and down arrows to scroll through the list of devices. Click to select. Click again to deselect if incorrect
- Find and click "Slave Console #" followed by all caps and green "MAKE SLAVE" for each additional console.
- Remove Data Disk from the side slot of "Master Console".
- Power on each additional console.
If there is an error the console screen will say so and the power light will flash yellow.
Troubleshooting[edit]
When powered, all associated doors and vents are locked, preventing their manual use even when power is subsequently denied. This can be a problem when trapped within an airlock during a power outage. Best practise is to ensure the airlock's wire network is connected to an emergency Power Supply such as a Battery Cell equipped Power Controller.
If the "External #Pa" or "Internal #Pa" are set to 0, the corresponding pressurization phase will be skipped, speeding up the cycle time, but can result in large wind currents when doors open.
A pressurization phase will stall if there is not enough gas available to the interior or exterior Active Vent to reach the set "Internal #Pa" or "External #Pa" specified in the Circuitboard's settings. Such stalled pressurization can be skipped by clicking the yellow "Cancel Pressurize" button on a console.
A depressurization phase will stall if a complete vacuum cannot be achieved within the Large Grid Volumes in which all selected Gas Sensors reside. Such stalled depressurization can be skipped by clicking the yellow "Cancel Depressurize" button on a console, but atmospheric mixing may occur. In larger airlocks, ensure there is one Gas Sensor per Large Grid to prevent premature repressurization and the resulting mixture of interior and exterior atmospheres.
The setup of slave consoles may still be bugged in such a way that after initial setup the slave console will show the config of an airlock, but be grayed out and not accept any input. It has been noted in several community posts that saving the game, quitting out of the game, and then reloading the save will allow the slave consoles to work after the reload.
