Difference between revisions of "Dedicated Server Guide"
From Unofficial Stationeers Wiki
m (Adding note for starting conditions on dedicated) |
m |
||
| Line 137: | Line 137: | ||
== Configuration from setting.xml == | == Configuration from setting.xml == | ||
'''Undocumented feature''' | '''Undocumented feature''' | ||
| + | |||
| + | Note: as of version 0.2.2840, setting the starting conditions on a dedicated server will allways Default to the first key found in startingconditions.xml. Could probably be a bug. | ||
''The server is mostly a stripped down client as such it inherits certain features'' | ''The server is mostly a stripped down client as such it inherits certain features'' | ||
| Line 242: | Line 244: | ||
|- | |- | ||
|} | |} | ||
| − | |||
| − | |||
Revision as of 14:59, 1 May 2021
Contents
Requirements
- Linux or Windows system, either physical or virtualised,
- must NOT be being used to run a Stationeers client (the game will not permit this).
- ~16GB RAM (Tested and confirmed on Linux). 8GB or less and the server won't load.
Getting the server files
SteamCmd on Windows and Linux
https://developer.valvesoftware.com/wiki/SteamCMD
This is a command line tool
steamcmd +login anonymous +app_update 600760 validate +quit
Dedicated Server Commands
String parameters can take space with double quotes.
| parameter | value | etc |
|---|---|---|
| -batchmode | Dedicated server runs without UI and start to listen port. | |
| -nographics | When running in batch mode, do not initialize graphics device at all. | |
| -logfile | "path" | If no output_log.txt use this parameter. Check examples below for syntax |
| -autostart | Dedicated server start to listen port without player input. It's always enabled on Linux dedicated server | |
| -autosaveinterval | integer | Save world in every interval. |
| -creator | int64 | Set creator's steam id as gamedata and key-value. This is for future integration of server instancing. |
| -worldname | string | Save game data automatically to existing file. |
| -worldtype | string | Worldtype(Moon, Mars, Europa2, Mimas, Vulcan2, Space, Loulan) Will overwrite actual map on server browser if you use rocket to travel beween maps etc |
| -loadworld | string | Load world from saved file. If loadworld is enabled, worldname command is ignored. |
| -gameport | integer | UDP port for game. Avoid to set 27015-27020. It's steam's local server query ports. |
| -updateport | integer | UDP port for steam query |
| -servername | string | Server title. (Depreciated: commandline only uses the first word, use servername in default.ini instead) |
| -basedirectory | string | Absolute base directory for custom profile Ex) -basedirectory C:\Profile\Player1 Config Path : default.ini C:\Profile\Player1\ Save Path : C:\Profile\Player1\saves\[worldname]
|
| -password | string | set server password |
| -maxplayer | integer | set maxplayer of dedicated server |
| -clearallinterval | integer | set the interval to run clearall command. Default and minimum value is 60 seconds. |
| -bindip | string | Bind specific IP address on dedicated server when it has multiple IP addresses. |
| -modpath | string | Absolute base directory for mods (be sure to use \ or / depending on system and end with one as well) |
batchmode, nographics and logfile are Unity3D commands.
https://docs.unity3d.com/Manual/CommandLineArguments.html
Examples
Dedicated server starts new Mars world. Autosave every 5 mins to Mars1.
rocketstation_DedicatedServer.exe -batchmode -nographics -autostart -autosaveinterval=300 -worldtype=Mars -worldname=Mars1 -basedirectory="C:\Server\User1"
Load Mothership file. Autosave every 5 mins.
rocketstation_DedicatedServer.exe -batchmode -nographics -autostart -gameport=27200 -updateport=27016 -autosaveinterval=300 -loadworld=Mothership
Load . Autosave every 5 mins. C:\Profile\Player1\saves\Mothership C:\Profile\Player1\saves\map1
rocketstation_DedicatedServer.exe -batchmode -nographics -autostart -autosaveinterval=300 -gameport=27200 -updateport=27016 -loadwo
rld=Mothership -worldname=map1 -basedirectory="C:\Profile\Player1"
Example -logfile syntax
-logFile "C:\Server_Path\rocketstation_DedicatedServer_Data\output_log.txt"
Example -loadworld="myworld" directory structure.
Note: BaseDirectory is by default in SteamApps/common/Stationeers Dedicated Server/<Contents of BaseDirectory> if installed with SteamCMD
Linux:
-loadworld="myworld" will look for a folder named "myworld" in the saves directory like this:
BaseDirectory/saves/myworld/
Windows:
-loadworld="myworld" will look for a folder named "myworld" in the saves directory like this:
BaseDirectory\saves\myworld\
Details:
In the world directory named "myworld", there must be a few files:
- world.bin
- world.xml
- world_meta.xml
Note: The names of these files do not correspond to your custom world name. These will always be called world.bin etc..
The server will automatically generate these upon first start. If you are importing another world, make sure these are in place in the correct directory for the server to load them.
There is also one more file that will be created:
- worldsettings.xml
Configuration from default.ini
default.ini will be created once you start it up for the first time. Command parameters override default.ini
 [SERVER]
 SERVERNAME=My First Stationeers Server
 GAMEPORT=27500
 UPDATERPORT=27015
 PASSWORD=
 ADMINPASSWORD=
 MAPNAME=Moon
 DESCRIPTION=Stationeers
 MAXPLAYER=10
 [RCON]
 RCONPASSWORD=stationeers
MAPNAME is always ignored
Configuration from setting.xml
Undocumented feature
Note: as of version 0.2.2840, setting the starting conditions on a dedicated server will allways Default to the first key found in startingconditions.xml. Could probably be a bug.
The server is mostly a stripped down client as such it inherits certain features
| XML Attribute | Parameter Case Sensitive |
Details |
|---|---|---|
| <RespawnCondition> | Easy, Normal, Stationeer | Or a custom key from a mod. Seems to be used as spawn conditions instead for new players |
| <StartingConditions> | Default, Minimal, Vulcan, Venus, BareBones | Or a custom key from a mod. Server ignores this, define custom worldtype |
| <ResearchPoolKey> | ResearchOff, ResearchOn | Or a custom key from a mod. Server ignores this |
| <SunOrbitPeriod> | default=1 | Multiplier on the time it takes for the sun to orbit, default is 20 minutes, 10 minute day 10 night. |
| Undocumented | ||
| <UseCustomWorkThreadsCount>false</UseCustomWorkThreadsCount> | true, false | |
| <MinWorkerThreads> | number | default=8 |
| <MinCompletionPortThreads> | number | default=8 |
| <MaxWorkerThreads>100</MaxWorkerThreads> | number | default=100 |
| <MaxCompletionPortThreads>50</MaxCompletionPortThreads> | number | default=50 |
| <CoroutineTimeBudget>1</CoroutineTimeBudget> | number | default=1 |
Example Setting.xml
<?xml version="1.0" encoding="utf-8"?>
<SettingData xmlns:xsd="http://www.w3.org/2001/XMLSchema" xmlns:xsi="http://www.w3.org/2001/XMLSchema-instance">
<RespawnCondition>Stationeer</RespawnCondition>
<StartingConditions>Mimimal</StartingConditions>
<ResearchPoolKey>ResearchOff</ResearchPoolKey>
<SunOrbitPeriod>1</SunOrbitPeriod>
</SettingData>
Savegames
Configuration from worldsettings.xml
Undocumented feature
The server is mostly a stripped down client as such it inherits certain features
| XML Attribute | Parameter | Details |
|---|---|---|
| <GameMode> | Creative, Survival | |
| <HungerRate> | default=0.25 | Multiplier on the amount of hunger generated per game tick. |
| <StartingCondition> | N/A | Can only be defined in custom world before generation |
Configuration from world.xml
| XML Attribute | Parameter | Details |
|---|---|---|
| <ResearchKey> | ResearchOff, ResearchOn | Or a custom key from a mod. |
| <RespawnCondition> | Easy, Normal, Stationeer | Or a custom key from a mod. Seems to be used as spawn conditions instead for new players |
Server Administrator
In Game Admin
ADMINPASSWORD parameter must be added to default.ini and set a password. This is different from the RCON password.
All commands are typed in the chat (enter) by default, starting with /login
Browser Based RCON
You can send commands on web browser, but this feature is currently broken. Login works, but all other commands are disabled.
Link : http://[dedicated server address]:[GamePort]
Command Lists
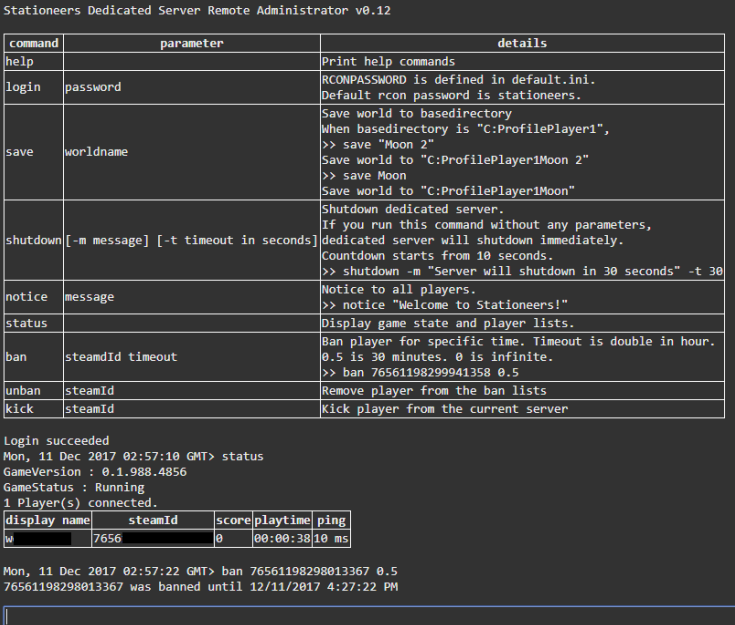
| Command | Parameter | Details |
|---|---|---|
| login | password | RCONPASSWORD is defined in default.ini. Default rcon password is stationeers. |
| save | worldname | Save world to basedirectory
When basedirectory is "C:\Profile\Player1", >> save "Moon 2" Save world to "C:\Profile\Player1\Moon 2" >> save Moon Save world to "C:\Profile\Player1\Moon" |
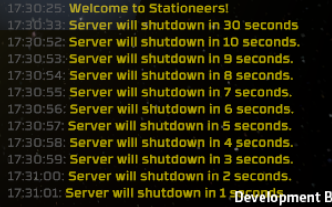
| shutdown | [-m message] [-t timeout in seconds] | Shutdown dedicated server. If you run this command without any parameters, dedicated server will shutdown immediately. Countdown starts from 10 seconds. >> shutdown -m "Server will shutdown in 30 seconds" -t 30 |
| notice | message | Notice to all players. >> notice "Welcome to Stationeers!" |
| status | Display game state and player lists. | |
| ban | steamId timeout | Ban player for specific time. Timeout is double in hour. 0.5 is 30 minutes. 0 is infinite. >> ban 76561198299941358 0.5 |
| unban | steamId | Remove player from the ban lists. |
| kick | steamId | Kick player from the current server. |
| clearall | Delete disconnected players | |
| hungerRate | hunger rate | Set hunger rate of server. 0 to disable hunger, higher numbers to make hunger drop more quickly. |
Game client displays messages in the system message window at this moment.

Modding on Servers
Undocumented feature
Mods are supported on Dedicated servers, however it requires additional manual configuration - Necessitating direct file access and editing on the dedicated server. To install mods, you'll need to manually obtain the mod data first - Either from the Steam Workshop, or built yourself. Upload/Store the mods in a specific folder on the server - You will also likely want to edit default.ini on the server to point to a particular server folder rather then the default directory, defined below. Then manually add ModConfig.xml in the root directory of the server executible files, and manually edit the file to add each individual mod.
modconfig.xml
Place a modconfig.xml in the serverfiles root (next to executable). Filename case is significant on Linux.
<?xml version="1.0" encoding="utf-8"?>
<ModConfig xmlns:xsi="http://www.w3.org/2001/XMLSchema-instance" xmlns:xsd="http://www.w3.org/2001/XMLSchema">
  <Mods>
    <unsignedLong>1</unsignedLong>
    <unsignedLong>1001</unsignedLong>
    <unsignedLong>1002</unsignedLong>
  </Mods>
  <DisabledMods>
  </DisabledMods>
  <LocalMods>
    <LocalMod>
      <folder>YourFirstModFolderHere</folder>
      <modID>1001</modID>
    </LocalMod>
    <LocalMod>
      <folder>YourSecondModFolderHere</folder>
      <modID>1002</modID>
    </LocalMod>
  </LocalMods>
</ModConfig>
Assign a number to each entry you want to add.
Numbers seem to default to 4 digits for mods when generated by the client,
so try and keep the same structure in the server to prevent complications.
1 is core file and always need to be enabled
Storing Mods
WIN: C:\Users\USERNAME_HERE\Documents\My Games\Stationeers\mods\
LIN: /home/USERNAME_HERE/My Games/Stationeers/mods/
OSX: /Users/USERNAME_HERE/My Games/Stationeers/mods/
\Modname or workshopid\About\
(file containing description about mod and thumbnail)
\Modname or workshopid\GameData\
(files you want to append to the core gamedata)
It's recommended to only put entries in the mod files you want to add or replace,
do not try and replace the whole file for compatibility issues and errors.
There are some examples of how to make your own mods in:
\Steam\steamapps\common\Stationeers\rocketstation_Data\StreamingAssets\
Look for ExampleMod.zip and AttributesExampleMod.zip .
Linux Server with LinuxGSM
You could run a Linux Dedicated Server on these Distros:
- Ubuntu 16.04/18.04 LTS
- Debian 8
- CentOS 7
Installation on a Ubuntu 18.04 LTS Server
It's possible to download the iso-file for installation from here:
https://ubuntu.com/download/server
This should not be a tutorial on how to set up a VM and install Ubuntu. There are many of them already out there.
First it's necessary to install all the dependencies for LinuxGSM:
sudo dpkg --add-architecture i386; sudo apt update; sudo apt install mailutils postfix curl wget file tar bzip2 gzip unzip bsdmainutils python util-linux ca-certificates binutils bc jq tmux lib32gcc1 libstdc++6 lib32stdc++6 steamcmd zlib1g
To not having the server running with root privileges, it is recommended to set up a new user for the game server.
To create a new user in linux use:
adduser stserver
For security best practice, ensure you set a strong password!
After installing the dependencies and creating a user, switch to that user and do the following steps:
su - stserver
Download linuxgsm.sh with wget.
wget -O linuxgsm.sh https://linuxgsm.sh
Make the script executable.
chmod +x linuxgsm.sh
Setup the Stationeers Server instance.
bash linuxgsm.sh stserver
Run the installer following the on-screen instructions.
./stserver install
The script now downloads the server binaries and default configuration.
Start and Stop the Server
To start the server use this command.
./stserver start
In Default the server will start a Moon map. To join the server use the local IP with the Port 27500.
To join the server from a different location, it's necessary to forward the port 27500/tcp and 27015/udp to the local server.
If it's not possible to connect make sure the Ubuntu Firewall is off or configured to let these ports open. To check this run this as root user.
ufw status
To disable it use:
ufw disable
To see the details use:
./stserver details
To stop the server use:
./stserver stop
This command shows all attributes
./stserver help
To show the live console of the server use:
./stserver console
To exit the console pres CTRL+b and then "d"
Edit configuration
The Configuration is stored under the folder lgsm/config-lgsm/stserver. There are three files:
- _default.cfg (contains the whole configuration with the default values Do not edit this file)
- common.cfg (the settings for this server)
- stserver.cfg (the settings for this instance)
If there is only one instance/server running and there will not be any other server it doesn't matter if you change the settings in common.cfg or stserver.cfg. If you planing to run more than one server or instance on the same VM you have to consider if the setting should apply server wide (all instances), or just for a specific Stationeers instance.
Example: Change map to Mars
Use your favorite text editor (ex. vi or nano) and open the _default.cfg (remember not to do any changes here) search for the setting you want to change and copy the text. In our example it is this:
  worldtype="Moon"
  worldname="moon_save"
Now open the file you want to configure. If you want any instance to run a Mars map use common.cfg or if only one instance should run this map use stserver.cfg (or stserver-2.cfg for the next instance). Paste the text at the end of the file and change "Moon" to "Mars"
  worldtype="Mars"
  worldname="mars_save"
Now restart your server with ./stserver restart
Make sure you also change the worldname (this is the folder where the savegame is). If the savegame-file is for a different world than the config is set to, the server will not start.

